
Materials Testing
Task 6 - Initial Materials testing
After looking at a few custom-made slipjoint knives online I noticed the main materials used for the products were as follows: Brass, High Carbon Tool Steel and Micarta (material that is usually fibre based that is suspended in resin). After buying the basic materials I thought the best way to experiment with the materials was to have a go at making my own folding knife.

I started out by sketching out a basic knife design with a slip joint mechanism (similar to what is found in a Swiss Army Knife). The way the knife folds is by a pivot point at the handle end of the blade, around the pivot is a squared off cam-based tang, which is held in place by a leaf spring down the back of the knife. This will become more clear as the production continues below.

To test the function and the movement of the parts I made tracings of the drawings and put them onto card-stock, then pinned them onto some foam-core poster board.

After confirming the parts functioned well on card I made parts from 2mm thick wood and some transparent acrylic sheet.

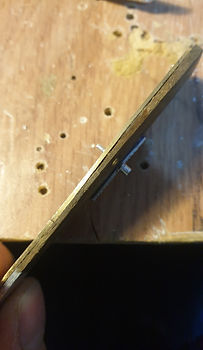
I started laying out my parts onto the O1 tool steel (2mm thick for the blade and back-spring) and layed out the scales on to the brown canvas micarta I had chosen for the build.
The micarta is very hard to work with initially, it is very fibrous and dulls saw blades very quickly. The act of cutting also softens the resin within the material, 'gumming' up the saw blade, making it even more difficult to cut. The saw dust is also toxic as it is essentially tiny particles of resin, so a respirator MUST be worn when cutting or sanding.
3mm diameter pins made from 303 stainless steel was chosen for its high wear resistance and corrosion resistance. This is due to its high nickel and chromium content. It was also chosen as it is malleable when cold under a hammer to allow me to peen the pins down to fully assemble the knife later on. 303 is typically used for propshafts in aircraft, so if it is good in those, much more, strenuous conditions it would be more than adequate for the application here.


The back spring was cut out from the 2mm thick O1 tool steel, to my suprise the steel was very easy to work with as the supplier I had purchased it from had completely annealed it, making the process of drilling and cutting very straightforward and did not dull my tools particularly quickly.
The 'shield' Inlay for the handle was made from damascus steel, this will be used as it forms a pattern on the surface when etched by Ferric chloride (PCB Etchant).


The Back spring needs to have a certain amount of preload to form tension against the pivot tang of the knife blade. to fo this I bent the spring downwards slightly in the middle. It was then hardened by heating it until red hot with a propane torch then quenching into motor oil. I then tested it had been hardened fully by running a file over it to see if it would skate across it rather than 'bite'. When the file skated, I then decided to polish the part so it would be easier to see the colouration of the steel when I applied heat to it to temper the steel, to make it both hard and flexible. the colour I aimed for was a light purple-blue. This is known as a spring temper. (guidence found at -https://www.practicalmachinist.com/vb/general-archive/spring-steel-tempered-annealed-76439/#:~:text=That%20is%20the%20hardening%20part,on%20heat%20treating%20spring%20steel.)
The blade was then hardened in a similar manor, but it was left in an oven at 200 degrees celcius for 2 hours after quenching to get it to be the correct hardness to hold a sharp, useable edge. (guide found here - https://www.azom.com/article.aspx?ArticleID=6229#:~:text=When%20repair%20welding%20of%20the,and%20soaked%20for%202%20hours.)


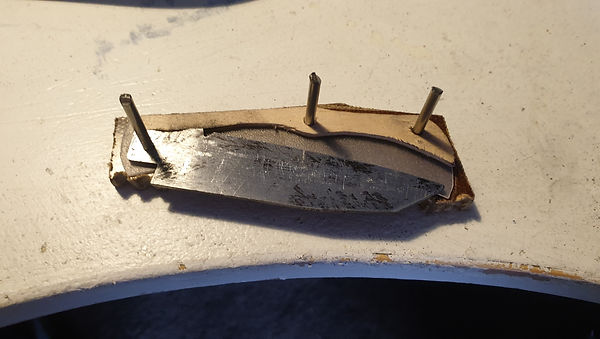
When testing the backspring and blade interaction using the brown micarta handles, I made them crack, as I made the micarta too thin to be strong enough for the task. So I had to make them again using a different colour micarta, then backing is with 1mm thick brass sheet, which both made the handle stronger, but heavier and it improved the folding action of the knife and the balance in hand.
The damascus shield was inlaid using a dremel tool as a small router to cut a channel for the inlay to sit in.

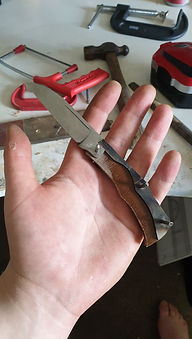
After the final assembly, the knife was polished with a buffing wheel on a Dremel and finished with a sharp edge, testing the blade was performed by cutting cardboard and rope, it held a sharp edge longer than a Victorinox Swiss Army Knife (paper cut test was used to see when the knives could no longer cut). This means that the steel has been properly heat treated and performs well.
When looking online at similar custom knives, I noticed the packaging they used was typically this velvet lined pouch and often came with a mini, business card sized note with information about the knife on it. I replicated this to experiment with how this could be used/sold as a real product.
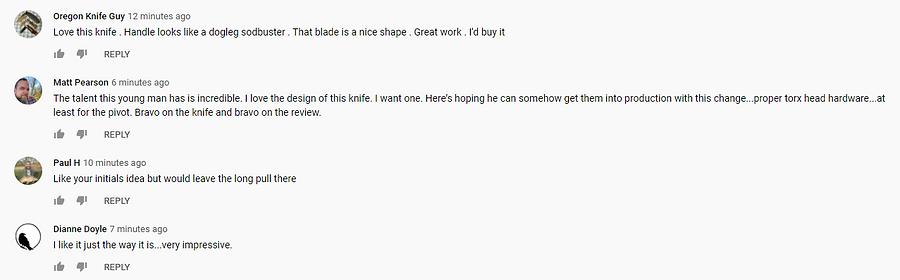
The next stage in my material testing is how the product as a whole performs when using these materials. I want to properly test the knife with various tasks and give it to a youtube reviewer, who deals with many knives and tools. For this I wanted a UK based knife reviewer with a large subscriber list to form validity of their performance as a reviewer. After searching with this criteria I spoke to a channel by the name of "Paddy's Potato Peelers". After sending him an email he agreed to review it on his channel, and carry and use the product for a few weeks to give me feedback on the item.
After viewing the video I have noted the design changes that may need to be made to the product. I will also be viewing the comment section of the video to look out for any suggestions that people may have on my design.
Task 6.1 - Secondary Materials testing and Skill Building
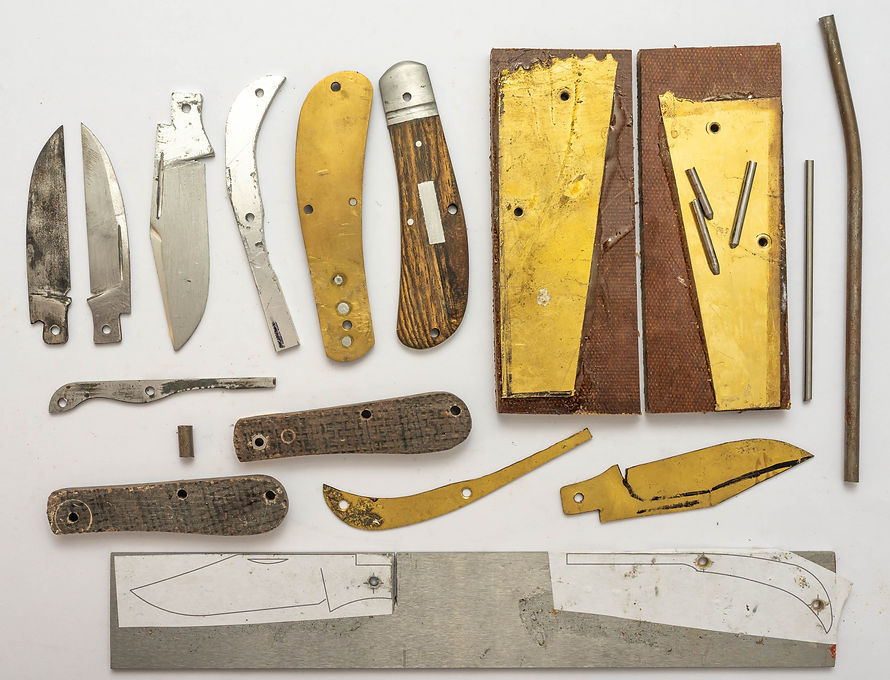
The above 'flat lay' Image shows further material testing work I completed over a few weeks - To summarise, I tried blade geometry grinding, riveting, and glueing flat surfaces together parallel with epoxy resin based adhesive.
Below I will expand further on the processes I tried:
Process 1 - Riveting


The riveting process began by drilling a 3mm hole through the aluminium and brass, then chamfering the two holes with a countersink drill bit. A 3mm thick rod of aluminium was then placed into the drilled hole. The aluminium rod is trimmed to sit approximately 1.5mm above each side of the aluminium and brass. This measurement was calculated as --> rod = 3mm / 2 = 1.5mm
After trimming the rod to the right length I peened the ends by holding the work peice over an anvil and hitting the end of the aluminium rod until both sides were flush with the rest of the piece on both sides.
Process 2 - Inlaying


A 3mm x 20mm aluminium bar was cut as the piece to be inlayed into the wood, Then the outside edge of the aluminium was traced onto the wood.
Using a small chisel the cavity was cut into the wood to allow the aluminium piece to be inserted.
once inserted I used the same technique as found above to rivet the shield into place, meaning I would have very little possibility of coming out.
The aluminium inlay was then sanded flush with the rest of the wood surface.
Thes scales were unfortunately abandoned as they ended up not being completely flat along the back brass section - which is imperative for the knife to function properly.
Process 3 - Milling


Using the milling machine was required in this material experimentation. After my feedback From Paddy's Potato Peelers I knew to get a better action to a folding knife, I needed tighter tolerances. To do this I layed out cad drawings of a knife design onto my 3mm thick O1 tools steel stock, then used the milling machine to cut the various slots and the square cham section of the folding mechanism. The milling machine created much better results than doing the process by hand with a file.
a 0.2mm deep recess was milled into the 1mm thick brass lining material used for the handles, this was done to help remove the 'scuff' marks found on the previous hand-made knife. By milling recesses the blade cannot rub on the liners causing the scuffing.