
Mark 1 Prototype
Task 10 - Knife Prototype Version 2 - Designing After Feedback
The Prototype version 2 of the knife, aimed to fix issues that were established with version 1 of the knife.
The Improvements to be made were:
-
Backspring and spine of the knife hafting (making all the materials meet and sit flush)
-
'Walk and Talk' of the folding mechanism - namely how it 'clicks into position'
-
Ergonomics - allowing for larger hands to use the knife
-
How the knife fits into a pocket (take up less space)
In light of the improvements listed above and feedback from Paddy's Potato Peelers video review (https://www.youtube.com/watch?v=QAyrN2QzMHY&t=328s), I went back to the drawing board and drew up CAD Drawing Plans on Autodesk Inventor. This file was printed off 1:1 scale onto A4 paper and used as a template for the build.


Further refinements to the Cad drawing was completed, then sent off to a manufacturer to see if they could CNC the main parts for my build - I am still waiting for a quote for the work to be completed, so in the Meantime I will complete the work by hand.
Task 10.1 - Knife Prototype Version 2 - Build
Using the CAD 2D layout drawings as a template, I cut out the 1mm brass sheets and the Black Linen Micarta for the handle. the 3mm 303 stainless steel pins were cut to length and the ends of the pins brought to a point, to help when inserting them into the handles when the backspring is applying pressure to the square end tang of the knife blade. The 'kite shaped' shield was cut out of 2mm thick O1 tool steel.
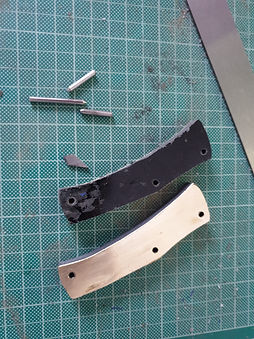
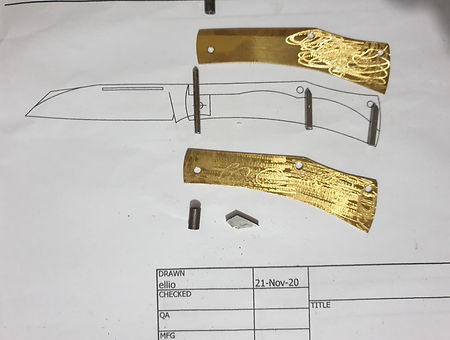
The brass liner material was epoxy glued to the back of the micarta, the surfaces were roughed up with coarse sandpaper, and then cleaned with paint thinner. The micarta scales were thinned to the correct specifications (4mm total thickness with liner, 3mm thickness for just the micarta). By using the Dremel with a router adapter I cut a recess for the sheild inlay to be completed, The sheild was then inserted with epoxy glue and then pressed in with a vice.

Using the blade template from the 2D CAD drawing, I mounted it to the 2mm O1 Tool steel flat ground stock using small magnets, then using a metal dye pen, I replicated the blade shape onto the blade stock. The blade pivot hole was then drilled with a 3mm drill bit, and then cut out.
Using a reference between the handle and the CAD drawings, I made the back spring. It was then spring tempered.


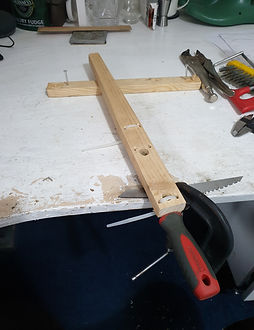
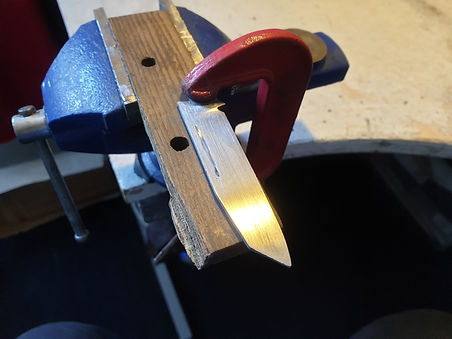
To Grind the bevels more consistently, I made a simple filing jig and hot glued it to my desk. The filing jig makes it much easier to grind the blade bevels than trying to angle the file by hand consistently and take off material evenly across the surface of the knife blade.

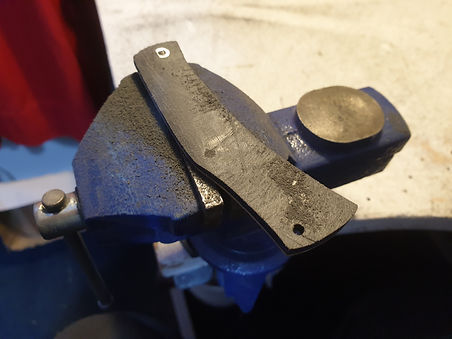
The blade was then heat treated and then given a good sanding to make all of the surfaces smooth and consistent to allow it to fold properly within the knife mechanism.
The parts were then all put together and the action tested to check that all parts were functioning properly.
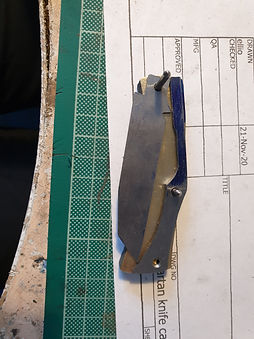
Once I was happy with the function of the knife I peened the metal pins down to the correct tolerances to keep the back of the knife tightly against the back spring, but also allowing the blade to move freely, and smoothly. Small adjustments to the pivot pin will make big differences to how the blade sits centred in the handle, so great care was taken when peening this part of the knife.


To put the Steel information and my makers mark on the knife blade, I used black nail polish on the blade, allowed it to dry, then scribed in the letters into the varnish. I then applied Ferric Chloride (PCB Etchant) to the varnished area, and left it for 40 minutes, this gave the etchant plenty of time to cleanly and deeply etch the scribed design onto the blade.
The knife was then sanded all over, going from 120 grit to 2000 grit wet and dry sandpaper. The whole Knife was then polished using a cotton polishing wheel for the dremel and some Dialux Blue polishing compound.
![20210213_140938[7060].jpg](https://static.wixstatic.com/media/4fb859_f74db7f3bcfc4616a7851888bdd6fa07~mv2.jpg/v1/fill/w_452,h_339,al_c,q_80,usm_0.66_1.00_0.01,enc_avif,quality_auto/20210213_140938%5B7060%5D.jpg)
![20210213_160544[7061].jpg](https://static.wixstatic.com/media/4fb859_ca84dc99c7034ce89ffab04c8357273d~mv2.jpg/v1/fill/w_255,h_339,al_c,q_80,usm_0.66_1.00_0.01,enc_avif,quality_auto/20210213_160544%5B7061%5D.jpg)
Task 10.1 - Knife Prototype Version 2 - Detail Photography and prototype comparison video


Task 10.2 - Leather Tool holders
After some research on the Slip joint Knives Collectors Page on Facebook I found that most people carry their slip joint knives in a leather slip. Those that carry multiple items on them, such as a pen, knife, torch or a note book may use what's called a pocket organizer.
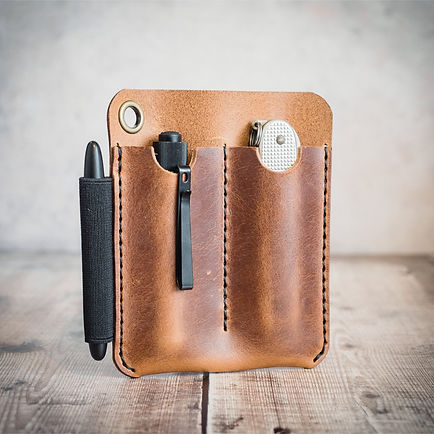
Below are two examples of such leather slips and organizers, these are made by the https://shiresupply.com/.

The most common types of leather used are Chromexcel Oil Tanned leather and Veg Tanned Cowhide. The reasoning behind this is the cow hides are readily available as a by=product of the meat industry, thus making it affordable for tanneries to produce the leather and supply it at a reasonable price. That being said, the Chromexcel leather is much more expensive as oil tanning is a longer process with more complex processes involved, however it does have a nicer surface finish than veg tan leather and feels much sturdier.
I tried making a few leather slips and organizers using both Chromexcel leather and veg tanned leather:
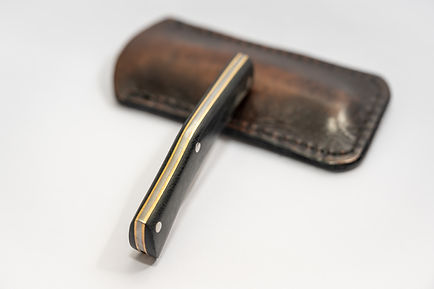
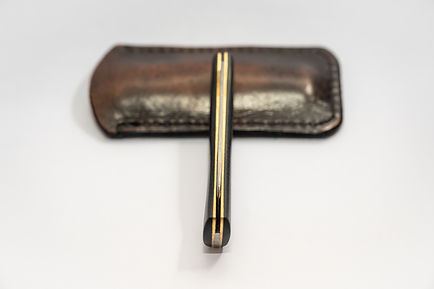
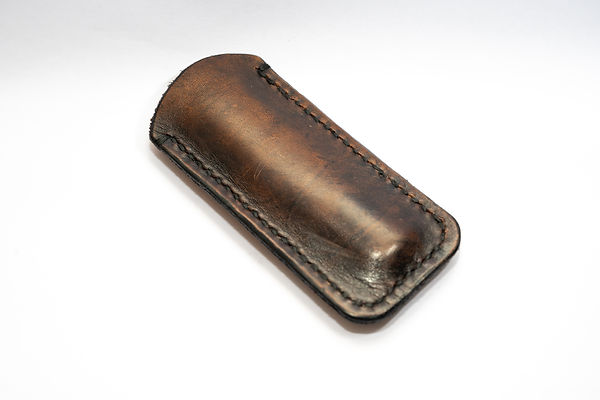
This is a prototype knife slip made from Veg tanned leather. The leather is very smooth and feels strong, however it creases much more readily than the Chromexcel leather, It also feels lighter and not as sturdy as the Chromexcel leather.
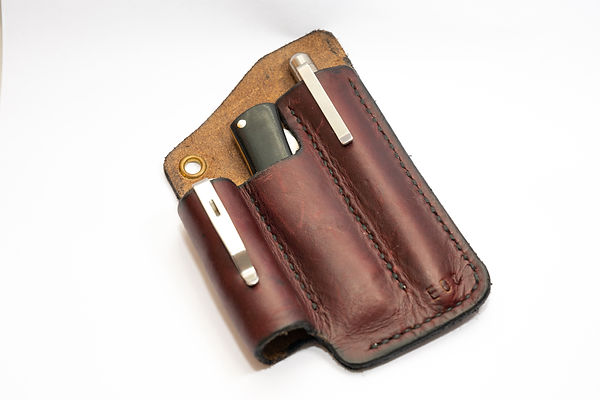
This knife slip prototype is made from Chromexcel leather and it feels much better quality than the slip from above. The Leather is oily and feels soft to the touch, however it has a robust feel and when scuffed the surface can be brushed off and the scuff marking will disappear to 99% of its original finish.

This Organizer is made using the same leather as the slip made above, it features three slots for various tools and a brass eyelet that can be used to attach a keyring to or attach it to the outside of a bag.
Task 10.3 - Designing leather tool and booklet holder
The Construction methods learnt above will be used to make the tool holder. It will feature multiple slots for the knife and tools needed to maintain the knife. The back of the organizer will contain the task booklet and a latching pocket for the task participants to collect items from their 'adventures'
![20210220_122718[7087].jpg](https://static.wixstatic.com/media/4fb859_49a97b3825f942b1b358eb3bd368c63d~mv2.jpg/v1/fill/w_600,h_432,al_c,q_80,usm_0.66_1.00_0.01,enc_avif,quality_auto/20210220_122718%5B7087%5D.jpg)